Monday, 28 April 2014

Bringing some disney decor to your home


Disney at Home

Love Disney? Been to the parks and now you want to bring some of the magic home? Me too….

Here I’ll share with you a whole range of ideas to add some of that Disney magic to your home, i’ll try to include everything from great Disney items you can buy, Disney DIY projects and how pick and choose elements from Disney to incorporate into your home.

I think there can be a really fine balance between incorporating some memories or favourite items and turning your home into a Disney museum.  Obviously the balance will be different for everyone, for me, I want a family home with a few touches of Disney Magic, a few "hidden Mickeys" if you will.  

Let me start by sharing some of my favourite items from around my home.

DIsney art 


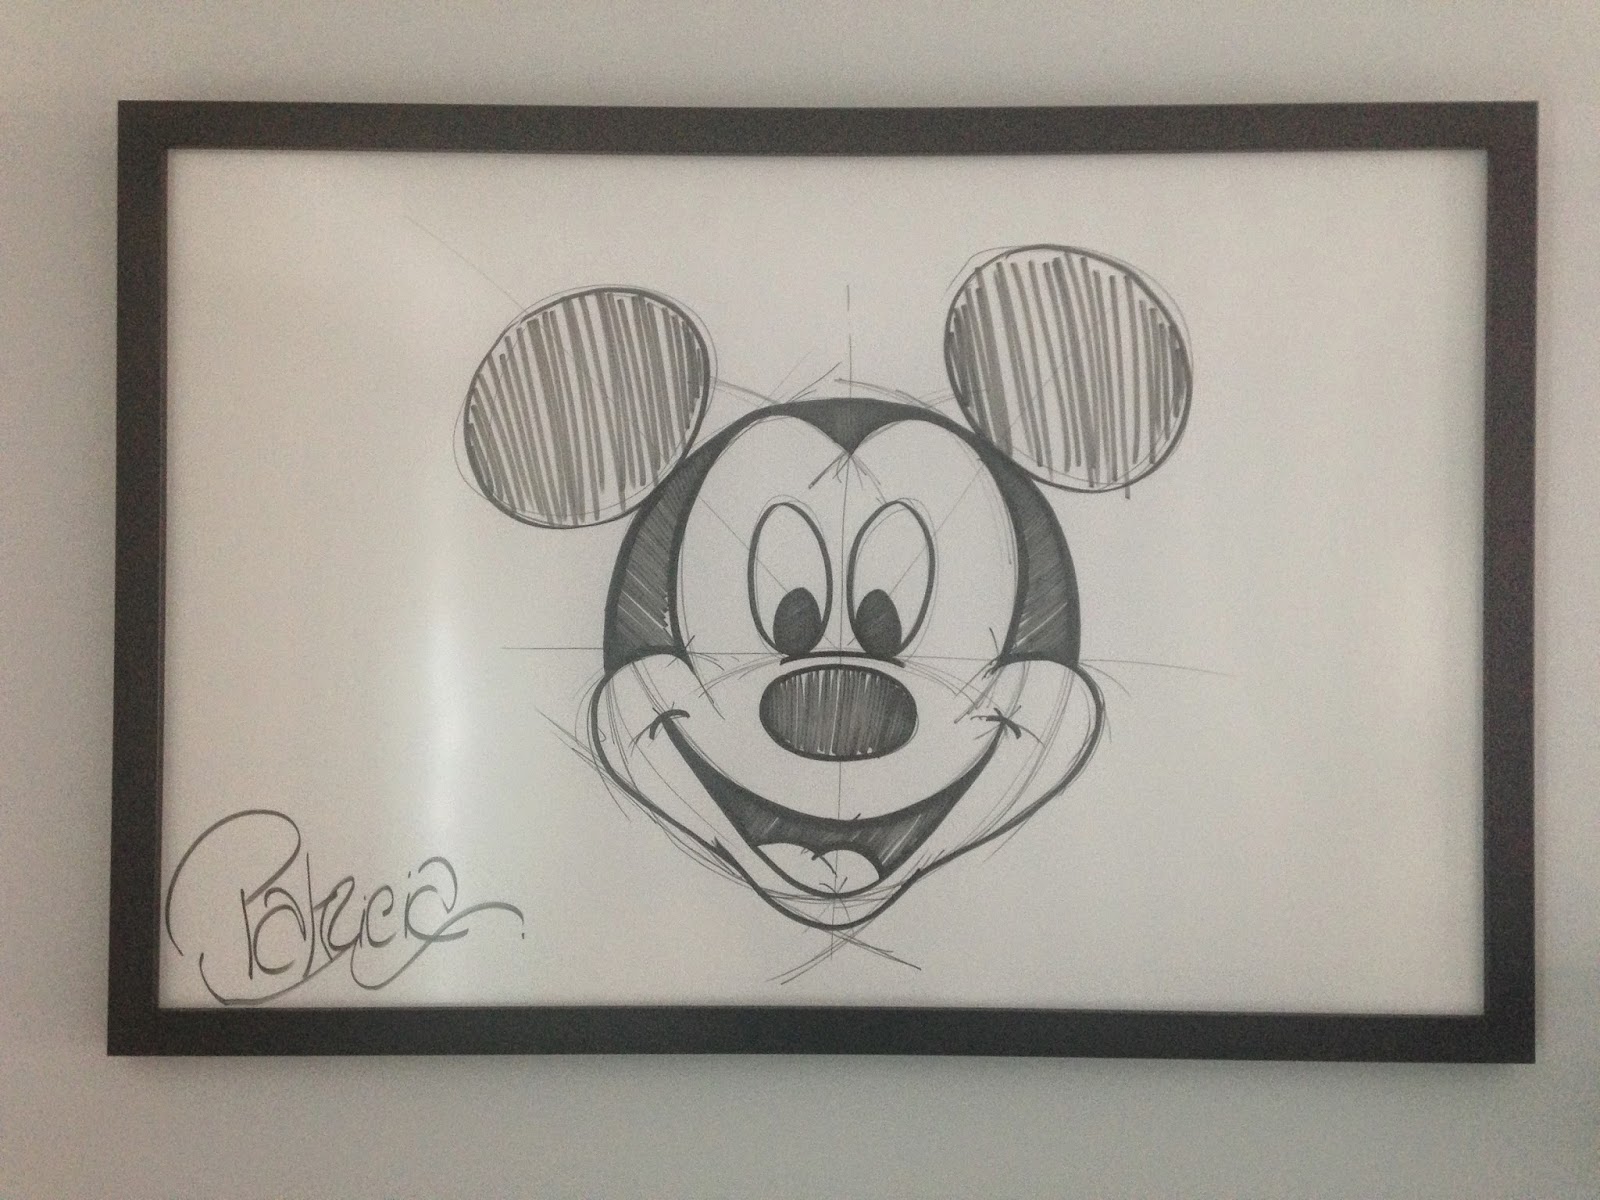
This is extra special to me as it has a bit of a story attached.  


On a recent trip to Disneyland Paris I ended up in the Art of Disney Animation drawing class alone, yes, just me and the artist.  Our subject was Mickey Mouse and at the end of the class I’m afraid my Mickey wasn’t looking great.  I’m not sure if it was pity or just because I was the only person in the class but afterwards I was given the artists drawing.  I just love the original pencil lines and its really big (around 1m wide)!  Getting it home un-crumpled was an almost impossible task but we managed it and took it straight to be framed.

I love some of the artwork sold by Disney but I'm afraid the price tags don't fit with my budget, if I wasn't lucky enough to get this picture I might have considered framing a disney poster (or 3), which are relatively cheap and widely available.


A DIY project for the family 


A really simple project I shared with my daughter last week was to make these Mickey soaps, I purchased the mould from Disneyland Paris although I think they are quite widely available and probably meant for cooking.  I bought some plain soap and melted it over boiling water, added some colouring and scent and made these.  

I’ve made them in all different scents and colours (I got mine from Hobbycraft but I'm sure others are available) for friends recently and they just seem to bring a bit of a Disney smile.  

I am no soap making expert - this is not a soap recipe, this is just ‘melt and pour’ but its quick and easy.  My extra tip if you are thinking of making these is that you can end up with a bubbly bottom(!) but I found that if you leave them for to cool for just a minute or so, they form a thin skin on the top which can be carefully removed - use a cocktail stick or something as the soap underneath with still be very hot and it leaves a lovely smooth surface when its all set.

I don’t want to state the obvious, but this process does involve boiling water and very hot molten soap so be very careful.


Also in our disney themed bathroom we have a Mickey soap dispenser and Mickey hand towels and of course our Mickey Soaps are used in here too.


I hope you have enjoyed these few items, Ill be back next week with some more Disney ideas for your kitchen.


Friday, 7 February 2014

Home Staging - a few pointers

I'm always searching for my next project and just this morning I saw a few photos of properties, I'll explain as I go along, but firstly will say that I don't own any of these photos, they are all images on the internet*.   


Firstly, if you have a bedroom which is a little small, an oversized teddy bear does not help.  I'm not in any way advocating misleading buyers about the room size, but a small teddy would help to add scale to the room.


At first glance, there is nothing really wrong with this picture, my problem is that it is listed as a dining room.  I'm sorry, but if it's got a front door and the stairs, and other rooms off it, it's a hall (unless it's a traditional style terrace where the front door opens straight onto the front room).  
Also, a table pushed up against a wall just screams about a lack of space, I would suggest buying or borrowing a smaller table or removing the table and replacing with a large rug for a really welcoming large hall.


I'm not saying don't put up Christmas decorations if your house is on the market, but it's February and really your agent should have been back to take new non-Christmassy pictures.  Same goes for snow.  I saw a picture on rightmove last August that had snow, it just didn't give the right impression.  Of course there are now websites which anyone can look at to see how long a house has been on the market (or most agents will tell you) but it certainly doesn't make me think, "Wow, I need to go and see this property today before anyone else snaps it up!"

Remember that you are paying your agent a lot of money and coming out a couple of times to take new photos is minimal work for them.  If your property is on the market for more than 6 months, I would strongly suggest a new set of images anyway, maybe following some rearranging or decorating, and taken from some new or different angles.  If a buyer has been looking for a long time, maybe a fresh look would make them interested.


*If one of the pictures is your house and you would like me to remove it, please get in touch and I will immediately.  I will also offer you a free consultation to see if I can assist you in styling your home to its full potential.

Tuesday, 4 February 2014

"Only put rubbish in a rental"

Although typically I only do property renovations to sell on immediately or style other homes, a client asked me to manage a renovation on a rental property.  Now that I'm nearing the end of the project I Have been reflecting on the differences between buy to sell and buy to let.  

The biggest thing that has really shocked me is the attitude of suppliers, even suppliers who know me and know that I will not cut corners or in any way compromise quality on a project, tried to push me into buying really low end items when they heard it was for a rental.

Now don't get me wrong, when I say quality, I don't mean I'm gold plating everything, everything is still on a budget.   Using a supermarket as an example, on a buy to sell, I tend to buy more "finest" products, on a rental I am buying mostly "own brand" and only a few items are "value".  

Having been a landlord(lady) before and seen first hand the devastation that a tenant can cause (smashed toilets, beige carpets turned black, crayoned walls and the most shocking - a broken electric shower which had been "fixed" with a knife!) so I know that there is a chance things will get damaged and not looked after as you would hope.  But it seems to me that if you only put in the very low end items, not only will then not last as long anyway, but the tenant will be far less inclined to look after them.

Not only will good quality last longer (unless the tenant is really terrible) but also the property is likely to be snapped up much more quickly between tenancies.  Say the rental is £500 a month, I'd rather spend an extra £1000 on a quality kitchen than put in the same cheap kitchen as everyone else and have the property sit unoccupied for 2 or more months.

The most shocking supplier was the flooring supplier, who was happily pricing the "normal" range for me until it came up in conversation that it was for a rental, at which point he said, "only put rubbish in a rental, you don't even want underlay".  It's a solid concrete floor, so yes, I really do think underlay would be a good idea. When I decided that none of the cheap vinyls were in any way attractive or a match for the bathroom tiles, I started looking at the more expensive (but still well within budget) range at which point I was given a severe telling off that I was "being too personal". Well, if being personal is wanting a nice looking house for a tenant and be good quality, then I am proud be be too personal!

As it happens, the house is not yet completely finished but already has a tenant signed up on a 2 year contract.  Since there are 4 other vacant rentals on the same and adjoining streets, this isn't just because it is in a nice area.  Clearly tenants are just as bored of the same old cheap kitchens as I am!


Not quite finished but here is the kitchen I put in.


Monday, 25 November 2013

Interior Design vs Real Homes

Lately, I've been thinking a lot about "Interior Design" and what it really means to me (I live in a real home with a lovely but untidy husband, a 2 year old with boundless energy and limited concentration and a dog with paws that are magnets for mud)

I guess when we say Interior Design these types of rooms spring to mind, a luxurious boutique hotel style bedroom or a large double height living space.


Both of which are gorgeous, don't get me wrong, but is it really possible for the majority of us to achieve this?  Of course it is for some people but for the majority, perhaps the dream and the reality are a little different. 

  
                The dream      vs       The reality 

There is absolutely nothing wrong with any property that you call home, but I feel like interior design magazines and some interior designers seem to think that large rooms with lovely high ceilings and endless budgets are the norm.  I'm confident that modern housing estates, with smaller rooms, standard low ceilings and small budgets are in fact much more usual.  

We don't and can't all live in period properties or New York style loft apartments.  So the challenge is to take these amazing designs for large grand rooms and translate them to smaller rooms without being overpowering.  I wish more 'interior design' magazines used real home examples - and I mean REAL homes, homes built in the last 20 years, with smaller proportions, of people who have children and pets and can't keep them showroom perfect all the time.  

It seems to me that this is like those size 8 mannequins in shops, where dresses look beautiful and drape perfectly - and then someone with a real figure puts in on and suddenly the dress is clinging unceremoniously to all the lumps and bumps.


Take this as an example, the first picture is a real living room in a modern house, but tidied (toys removed) and styled for a photograph.  The second picture is the tidiest version of reality, including children's toys.  

With this as reality, I like to focus my designs on clever and practical uses of space.  I believe functional does not equal ugly or boring, but functional is perhaps more important than beautiful in a real family home and a balance needs to be found.  


Saturday, 9 November 2013

Pinterest

It has taken me a while to get into Pinterest, but I have to say I am now totally addicted.  I just love that I can stick all the great ideas I see in one place.  I used to have to photograph or save and print them all into a book.  This is so much easier.

I divide my boards up into rooms mainly, plus one general ideas board for 'doesn't quite fit into any other category'.  I thought I would share some of my favourite finds here.  

As you can see from my examples, I mix up whole rooms with bits of ideas as well as wallpaper and paint samples.  All for future reference.  I first found this cobalt and cream bedroom image, which I loved, then I went in search of similar wallpaper and fabric (which I found at Scion).  Next time I fancy a cobalt bedroom I have all the details to hand - brilliant. 


Have a look at my Pinterest bedroom board here


Some ideas are things I have seen, some are things I would like to do and some are things I have done, like this frame, which was a quick and cheap solution when a client needed me to style a very plain bedroom.  The frame is from IKEA (£7) and the picture is actually wedding wrapping paper (50p).  I put 3 side by side and made a very simple but effective temporary focal point.


For me, the best thing about Pinterest is that I can access it on my phone or laptop and just dip in and out when I need an idea, inspiration or try to visually explain what I am talking about.  

If you want to nosy at the rest of my boards of ideas, please click here.  If you any of the images or ideas pin them to your idea boards or feel free to follow them.  I am adding new pictures and links all the time.


Friday, 8 November 2013

I always get excited about flooring day

So flooring day is a misleading title, it's flooring 3 weeks on this project.  With 3 types of flooring and 3 fitters, each with their own speciality.  We are doing carpet (too boring to talk about), Amtico and Flotex to suit the needs of the different rooms. 

The Amtico is now in progress and although I have often suggested it and lusted after it, I haven't used it on a project of mine before.  It is being used in the kitchen, utility and hallway.  

The kitchen was fairly simple, large tiles with a thin trim between (more about the thin trim later), which looks great and doesn't really show the fact that the room isn't completely square.

Kitchen (before plinths replaced)

The hall is proving much more difficult, it's a square(ish) hall with one small and one large corridor continuing from it. I have gone for an oak herringbone effect in here, as the impact in the wide hall will be great.  The problem is that, as with many older buildings (and some new builds to be honest) rooms aren't always square. It turns out in this one, no two walls are square.  Needless to say the fitter isn't delighted but doing a great job anyway with lots of maths and some slight adjustments to the alignment.


Hall in progress
So back to the kitchen and the thin trims, which are very fine slices of the same oak as the hall.  Its subtle but it does bring it all together.

The carpet fitter is also working some magic, no wastage here as all the excess pieces are sewn back together to carpet inside the  cupboards and one of the bathrooms.


Flotex is a product I hadn't come across before, if you've never heard of it before either I can only really describe it as furry vinyl, it actually reminds me of fuzzy felt (although that probably ages me). It's a really practical flooring, it is treated as carpet for cleaning so can be vacuumed as a regular carpet, or with a wet carpet cleaner (specific advice regarding detergents applies)as it's vinyl base make it waterproof.  I chose to use it because the room in question was cold, so the flotex was laid over a layer of insulated board.


Tuesday, 23 July 2013

How to unify 3 different doors along one wall

While renovating a property, I was faced with a bedroom with 3 doors along one wall; a very narrow door to the ensuite, a floor to ceiling cupboard door and the entrance to the room.  All 3 were different sizes and looked very inconsistent.  


I decided that I needed to bring some uniformity to this row of doors, so I searched for doors which came in multiple widths (and also a glazed option for elsewhere in the property) which was a challenge on a tight budget but eventually found a range in B&Q which had the standard 762 width for the main door and 610 widths for the ensuite and the cupboard.  The current ensuite and cupboard doors weren't quite the right sizes so my joiner slightly widened the ensuite door and boarded the top of the cupboard door to create a standard door height and made the door slightly narrower.  As you can see below, the cupboard is actually only strange access to the rear of the ensuite shower with about 3 inches of storage space so losing a small amount of the access to this was no problem.


Once the new frames were in place and the surrounding wall plastered the new doors were hung, creating a much more unified feel to the room.  It would have been nicer to have extended the two narrower doors but it just wasn't possible, so I feel this was the next best option.